Start here if you want to work on MimIR itself. This page is the contributor entry point for build, test, style, and debugging workflow. For API and IR usage patterns, continue with the Developer Guide. For subsystem-specific material, see Plugins, Rewriting, and Phases.
Contributor Quick Start
If you do not have a GitHub account set up with SSH, you can clone MimIR via HTTPS instead:
git clone --recursive https://github.com/AnyDSL/MimIR.git
For day-to-day development, a good default is:
cmake -S . -B build -DBUILD_TESTING=ON -DMIM_BUILD_EXAMPLES=ON
cmake --build build -j$(nproc)
Useful follow-up commands are:
cmake --build build --target lit
ctest --test-dir build --output-on-failure
pre-commit run --all-files
The following CMake switches are available:
| CMake Switch | Options | Default | Comment |
| CMAKE_BUILD_TYPE | Debug | Release | RelWithDebInfo | Debug | Build type. |
| CMAKE_INSTALL_PREFIX | | /usr/local | Install prefix. |
| MIM_BUILD_DOCS | ON | OFF | OFF | If ON, build the documentation
(requires Doxygen). |
| MIM_BUILD_EXAMPLES | ON | OFF | OFF | If ON, build the examples. |
| MIM_ENABLE_CHECKS | ON | OFF | ON | If ON, enable expensive runtime checks
(requires CMAKE_BUILD_TYPE=Debug). |
| BUILD_TESTING | ON | OFF | OFF | If ON, build all unit tests and lit tests. |
| MIM_LIT_TIMEOUT | <timeout_in_sec> | 20 | Timeout for lit tests.
(requires BUILD_TESTING=ON). |
| MIM_LIT_WITH_VALGRIND | ON | OFF | OFF | If ON, run the Mim CLI in the lit tests under Valgrind.
(requires BUILD_TESTING=ON). |
Dependencies
In addition to the provided submodules, you will need:
- a recent version of CMake,
- a C++20-compatible C++ compiler, and
- optionally LLVM.
Mim emits LLVM IR, but it does not link against LLVM. So you can simply hand the emitted *.ll file to your system's LLVM toolchain. Strictly speaking, LLVM is not required unless you want to continue from emitted LLVM IR.
Testing
lit Tests
Run the lit test suite with:
cmake --build build --target lit
You can also invoke the lit tests manually and filter for a specific test:
cd lit
./lit ../build/lit -a --filter foo.mim
If your build directory is actually called build, you can also use probe.sh:
cd lit
../scripts/probe.sh foo.mim
- Note
- To generate a one-line reproducer for the current checkout and a specific lit failure, use:
./scripts/make_lit_error.sh foo.mim
GoogleTest
Run the GoogleTest unit tests with:
ctest --test-dir build --output-on-failure
You can additionally enable Valgrind via:
ctest --test-dir build -T memcheck --output-on-failure
During debugging, you will usually want to run only a specific test case. You can filter tests like this:
build/bin/mim-gtest --gtest_filter="*Loc*"
This command lists all available tests:
build/bin/mim-gtest --gtest_list_tests
It can also be useful to turn assertion failures into debugger breakpoints:
build/bin/mim-gtest --gtest_break_on_failure
- Note
- To generate a one-line reproducer for the current checkout and a specific GoogleTest failure, use:
./scripts/make_gtest_error.sh "mim.World.dependent_extract"
Coding Style
C++ Style
Use the following coding conventions:
- Class/type names use CamelCase.
- Constants defined in an enum or via static const use Camel_Snake_Case.
- Macro names use SNAKE_IN_ALL_CAPS.
- Everything else - variables, functions, etc. - uses snake_case.
- Use a trailing underscore for private_or_protected_member_variables_.
- Methods/functions that return a bool should be prefixed with is_.
- Methods/functions that return a std::optional or a pointer that may be nullptr should be prefixed with isa_.
- Do not do this for a public_member_variable.
- Use struct for plain old data.
- Use class for everything else.
- Prefer // C++-style comments over /* C-style comments */.
- Use #pragma once as the include guard for headers.
- Order visibility groups like this:
- public
- protected
- private
Doxygen Style
- Use /// for Doxygen comments.
- Use Markdown-style Doxygen comments.
- Group related functions, methods, etc. via named member groups.
- Capitalize the group name unless it is directly named after a method.
For all the smaller details such as indentation width, use clang-format and the provided .clang-format file in the repository root.
To run clang-format automatically on changed files, install the provided pre-commit hook:
You can also disable clang-format for a piece of code when necessary. Depending on your editor, the Vim integration and similar plugins may also be useful.
Example
Here is a small header that follows the conventions above:
#pragma once
class Foo {
public:
Foo(int foo, int bar)
: foo_(foo)
, bar_(bar) {}
int foo() const { return foo_; }
int bar() const { return bar_; }
private:
int foo_;
int bar_;
};
}
CMake Style
- Use 4 spaces for one indentation level.
- Prefer lowercase CMake commands such as set, if, foreach, and add_subdirectory.
- Use uppercase names for project-specific CMake variables and options such as MIM_BUILD_DOCS or MIM_PLUGINS.
- For longer CMake calls, put arguments on separate indented lines instead of cramming everything onto one line.
Markdown Style
- Use one sentence per line in Markdown prose.
- Do not hard-wrap Markdown text to 80 columns.
Mim Coding Style
- Prefer the primary UTF-8 surface syntax over ASCII-only spellings when writing Mim code and tests.
- Prefer 4 spaces for one indentation level, but aligned layouts may use different spacing when that makes the code clearer.
- Write callable declarations with parenthesized domain groups, for example lam foo (x: X) (y: Y): Z = ....
- Prefer group patterns lam foo (a b c: T) over lam foo (a: T, b: T, c: T)
- Separate curried domain groups with a space, and write the return type as ): Z, with no space before : and one space after it.
- Use spaces after commas in lists and groups: a, b, c.
- Write binder ascriptions as x: X, but keep literal and bottom ascriptions tight: 23:T.
- Use snake_case for value-level names such as functions, lambdas, binders, local lets, and pattern-bound values.
- Use CamelCase for type-level names such as types and type constructors.
Syntax Highlighting
This Vim plugin provides syntax highlighting for Mim files.
There is also a tree-sitter grammar for Mim files and a Helix fork with highlight and injection queries.
Debugging
The Testing section above already provides some debugging tips. This section has more information about this topic.
See also:
Dumping
You can directly invoke several MimIR dump helpers from within GDB, for example:
(gdb) call def->dump()
(gdb) call def->dump(0)
(gdb) call def->dump(3)
(gdb) call world().write("out.mim")
In particular, note the different output levels of mim::Def::dump.
You can also tweak the output behavior directly from within GDB by changing mim::World::flags or mim::World::log:
(gdb) call world().flags().dump_gid = 1
(gdb) call world().flags().dump_recursive = 1
(gdb) call world().log().max_level_ = 4
Another useful trick is to recover a Def* from a mim::Def::gid via mim::World::gid2def:
(gdb) p world().gid2def(123)
$1 = ...
(gdb) call $1->dump()
Displaying DOT Graphs
scripts/xdot.gdb provides custom GDB commands to generate a DOT graph and display it with xdot.
To enable it, source scripts/xdot.gdb from your ~/.gdbinit:
source ~/mim/scripts/xdot.gdb
Here is the xdot GDB command in action:
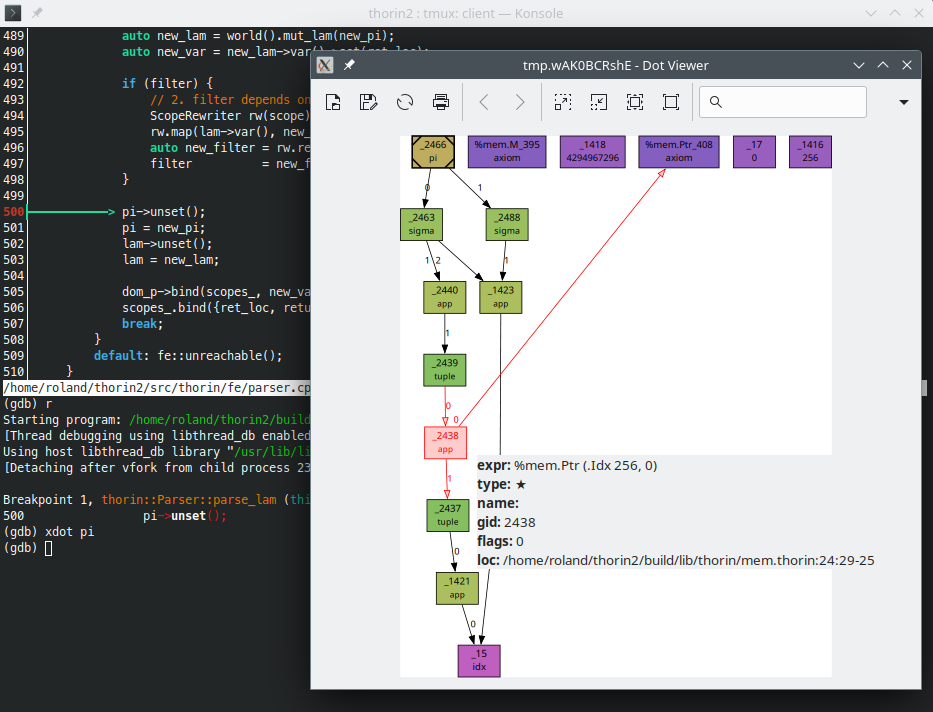
cgdb session using xdot
xdot
Generates DOT output for the given EXP and invokes xdot.
Usage: xdot EXP [MAX] [TYPES]
EXP Must provide $EXP->dot(file, $MAX, $TYPES).
MAX Maximum recursion depth while following a Def's ops.
Default: 0xFFFFFFFF.
TYPES Follow type dependencies?
Default: 0 (no)
Examples:
xdot def - Show full DOT graph of 'def' but ignore type dependencies.
xdot ref.def_ - As above but on a Ref.
xdot def 3 - As above but use recursion depth of 3.
xdot def 3 1 - As above but follow type dependencies.
xdott
Generates DOT output for the given argument and invokes xdot while always
following type dependencies.
Usage: xdott EXP [MAX]
Same as: xdot EXP $MAX 1
xdotw
Generates DOT output for the given World and invokes xdot.
Usage: xdotw WORLD [ANNEXES] [TYPES]
WORLD Must provide $WORLD.dot(file, $ANNEXES, $TYPES).
ANNEXES Include all annexes - even if unused?
Default: 0 (no)
TYPES Follow type dependencies?
Default: 0 (no)
Note:
xdotw expects the address of the World.
Examples:
Show DOT graph of 'world' - ignoring type dependencies and unused annexes.
xdotw &def->world()
Show full DOT graph of 'world' including types and all annexes.
xdotw &def->world() 1 1
Conditional Breakpoints
Often, you will want to inspect a specific mim::Def at a particular point in the program. Conditional breakpoints are very handy for this.
For example, the following command breaks if the mim::Def::gid of variable def is 42 at source location foo.cpp:23:
break foo.cpp:23 if def->gid() == 42
Catching Exceptions
For several things, such as errors in the Mim frontend, MimIR uses C++ exceptions for error handling. To stop when an exception is thrown, use:
Valgrind & GDB
If you run into memory-related problems, it can be useful to run the program with Valgrind's GDB server.
Launch the test binary like this:
valgrind --vgdb=yes --vgdb-error=0 build/bin/mim-gtest
and then follow the instructions printed by Valgrind.
Triggering Breakpoints
You can tell mim to trigger a breakpoint when certain events happen:
mim test.mim -b 1234 # Break if the node with gid 1234 is created.
mim test.mim -w 1234 # Break if the node with gid 1234 sets one of its operands.
mim test.mim --break-on-alpha # Break if a check for alpha-equivalence fails.
See the Command-Line Reference for the full list of flags.